The Item Details Area
Overview
The region immediately below the plot within the Plot Window is known as the Item Details Area. This area is used to display details relating to each item that is assigned to a pen within the active plot.

Should an item value rise above or drop below the scale set for it, an Off Scale Indicator will appear next to the details for that item.
Note: For Radar plots the Item Details Area is distributed around the circumference of the radar plot at the end of each radial rather than being located at the bottom of the plot.
Tip: By double clicking on the required item it is possible to use the Item Details area to launch the Plot Properties dialog with the focus set on the chosen item.
Choosing the fields to display
By default, the item details area will show two rows of data per pen. These will show the Display name and the Value for each pens. The User can choose how many rows of data should be displayed for each pen.
Other options are:
-
Item Name
-
Description.
-
Data Location
-
Scan Frequency
-
Units
-
Timestamp
-
Scale Minimum
-
Scale Maximum
-
Pen Number
For more information see the Plot Properties View tab
Tip: Should sufficient items be mapped to pens such that the item details cannot fit on the plot, then a left and right hand spin button will appear such that the user can 'scroll' through the items.
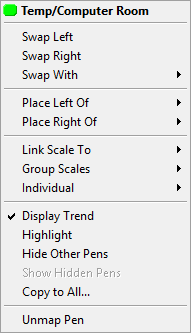
Right Click-menu
In addition to displaying details about the pens, the Item Details Area can also be used to manipulate the pen settings. To do this, right-click over the required pen.
The following menu will then be presented:
|
|
|
Option:
|
Purpose:
|
|
Swap Left
|
Swap the selected pen with the pen immediately to its left in the Item Details Area.
|
|
Swap Right
|
Swap the selected pen with the pen immediately to its right in he Item Details Area.
|
|
Swap With
|
Swap the selected of the highlighted pen with another specific pen.
|
|
Place Left Of
|
Position the selected pen to the left of the another pen.
|
|
Place Right Of
|
Position the selected pen to the right of the another pen.
|
|
Link Scale To
|
Link the scale of the selected pen to another pen within the current plot.
Note: It is not possible to link the scale of a pen back to another pen which in turn is linked to the chosen pen. Doing so would create a circular reference so only valid pens will be offered in the resulting sub-menu.
|
|
Group Scales
|
Apply a Group Scale usability function to the pens within the current plot. This will add pens to one or more new scale group depending on whether they match the criteria for the chosen operation.
Valid options are:
-
PV's and SP's - the logic works through all the pens in the plot, creating a scale group for each PV & SP pair found using the item name to seed the group name.
-
X-axis Pens - create a single group scale and assign all X-axis pens to it.
-
Y-axis Pens - create a single group scale and assign all Y-axis pens to it.
-
OP's - if any OP's are found they are all added to a scale group called "All OP's".
-
All Pens - all the pens in the plot are added to a scale group called "All Pens".
Note: The X and Y axis options are only applicable to X/Y Graph Styles.
|
|
Individual
|
Set the scale of the selected pen back to the default setting of individual from previously being Linked to another pen, or part of a Group Scale.
Valid options are:
-
Manual - the user has complete control of the scales and can freely edit the Minimum and Maximum data entry fields.
-
Actual - the scales reflect the minimum and maximum values for the item within the time period currently being displayed.
-
Auto - the pens scale will be calculated automatically. Only pens that are in Auto mode are taken into account by the algorithm which attempts to maximise the acreage used by each pen whilst minimising overlap.
|
|
Display Trend
|
Specify whether the Trend line for the selected pen should be visible on the plot.
|
|
Highlight
|
Highlight the selected pen by doubling it's line thickness.
|
|
Hide Other Pens
|
Hide the trend lines for all other pens on the plot bar the selected pen.
|
|
Show Hidden Pens
|
Make any hidden pens visible again.
|
|
Copy to All...
|
Copy some of all of the settings from the selected pen to other pens in the plot or session.
|
|
Unmap Pen
|
De assign the selected pen.
|
|
Tip: The ordering of pens can also be controlled via the Pen Manipulation buttons on the Plot Properties Mapping tab.