
The Item list Area allows the user to quickly assign items to pens for trending.
The quickest technique for mapping an item to a pen, is to double click the item name within the item list. This will map the item to the next free pen. To de-assign an item from a pen simply double click the item name. The pen that was used will then be available for re-mapping.
The Toggle button can also be used to map the selected item.
Note: The order of the columns can be changed as can the list of columns that can be viewed. For further details see the List Control section.
Tip: Hit a key whilst the focus is within the item list area to jump to the items whose name begins with the chosen character.
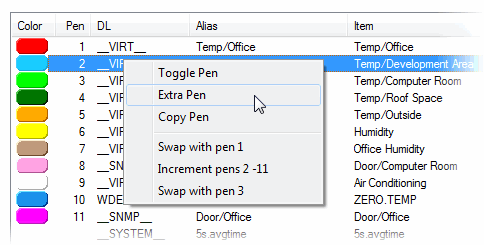
In addition to mapping pens, the Item list area can also be used to re-order existing pen selections. To promote or relegate a pen, click once on the chose pen to select it and then right click to bring up the pen manipulation dialog.

In the example shown, Pen 2 has been selected. The position of Pen 2 can now be exchanged with Pen 1 (promoting Pen 2) or with Pen 3 (relegating Pen 2).
Having selected a pen and brought up the right click menu, the user can create a gap allowing a new Pen to be inserted into the middle of an existing list.
In the example shown above, Pen 2 is selected. The user therefore has the option or incrementing all the Pen numbers from 2 onwards. This will cause Pen 2 to become Pen 3, Pen 3 to become Pen 4 and so on. The next time a new Item is assigned to a pen it will be assigned to the missing Pen, in this case Pen 2.
To map multiple pens use the standard Microsoft Ctrl and Shift key operations to select the required item(s). Once the required items have been highlighted, hit the toggle button to assign (or deassign) the chosen pens.
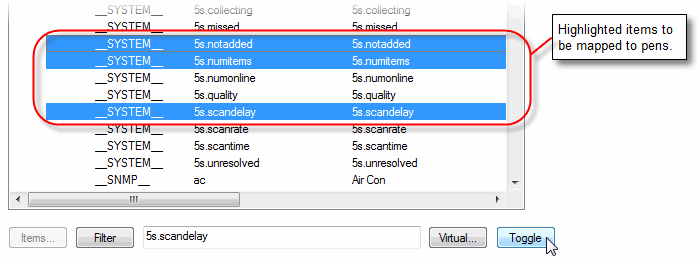
Note: If the range of items chosen includes items assigned to pens, then they will be deassigned as a consequence of hitting the 'Toggle' button.
SapphireTrend allows the same OPC item to be trended multiple times within a plot. To do this highlight the pen that you wish to duplicate by single clicking on it and then right-click.
There are two options that will allow a 'duplicate' of the selected pen to be created:
Extra Pen - select this option to create an additional pen at the end of the pen list. The default pen properties will be assigned to the new pen
Copy Pen - select this option to 'clone' the existing pen. The pen attributes from the source pen will be copied to the new pen.
This technique is extremely useful for X-Y plots as it means you can plot a number of Y variables against a common X variable (or vice versa).
Example,

In the example shown below a common Y variable of "time.seconds" has been plotted against 3 different X variables.
Tip: To aid clarity it is advisable to uncheck the Data tick box for the duplicate Y pens so that only one entry for "time.seconds" is shown in the item details area under the plot. It is also advisable to set the duplicate pens to use the same scale by using the Link to Pen scale mode.
For X-Y plots Pens are not numbered as 1, 2, 3, 4 ... n, but as 1x, 1y, 2x, 2y and so on. This is because X-Y plots display pairs of OPC items rather than items against time as is the case of Strip-Charts and Radar Plots.
Tip: To allow the user to easily change the Graph Style for a given plot, stPro automatically assigns the pairs of pens for X-Y plots based on the individual 'pen numbers'.
Note: In each pair it is always the X member that defines the pen colour and Cross hair style for the pair.
As with Strip Charts and Radar Plots, the pen assignments for X-Y plots can be reordered using the Right-click option described above.